PE “SPPE
“Sparing-Vist Center”
GS Ecotest
Version 2.0.0
User
Guide
December 13, 2013
Important! To use all features of the “GS Ecotest” application,
the Android device (a smartphone/tablet) on which
this application is running must contain a built-in Bluetooth adapter!
Terms and abbreviations used:
· “Gamma Sapiens” IGD – the “Gamma Sapiens” intellectual gamma radiation detector UDKG-01A
(UDGKG-01АPro) of “ECOTEST” trademark;
· IDK – the intellectual
dosimetric kit consists of the “Gamma Sapiens” IGD
and the “GS Ecotest”
application;
· DER – ambient dose equivalent rate of
gamma radiation (dose rate);
· DE – ambient dose equivalent of
gamma radiation (dose);
· *Android OS – an operating system of
Android™;
· Android device – a smartphone or a tablet based on the Android OS;
· Database – a local database for
storing measured dosimetric data.
*Android™ is a trademark of Google Inc.
3.2 Setting up each connection
4.2 General principles of “GS Ecotest” performance
4.2.2 Features of dosimetric information measurement and display
4.2.3 Features of introduced concepts and terms
4.3.1 Graphical components of the Indication mode
4.3.2 Description of additional functions menu
4.4.1 Expot to external mapping services Google Earth and Google
Maps
4.4.2 Display of tracks on a map
4.6.1.10 Clearing an ENTIRE database
4.6.4 Start/Stop track recording
The “GS Ecotest” application is used only with the intellectual
dosimetric kit (IDK) and is
intended to be installed on smartphones or tablets
that are compatible with the Android
OS. The “GS Ecotest” application is designed to
process and display dosimetric information, which is
continuously transferred from the “Gamma
Sapiens” intellectual gamma radiation detector to a smartphone
or a tablet over the Bluetooth interface in real time.
The intellectual dosimetric kit can be used to:
· monitor personal radiation safety;
· monitor apartments, buildings,
household items, clothes, soil surface of infields, and vehicles exposed to
radiation;
· evaluate the radiation situation in areas
for nature-based recreation, tourism, hunting, and fishing.
The “GS Ecotest” application is on Google Play and is available for download for Android users.
For information about technical and functional
specifications of the “Gamma Sapiens”
IGD, visit the manufacturer’s website: http://www.gamma-sapiens.com.ua/en/about-gs-ecotest/.
2
Main features of GS Ecotest
It provides the
possibility to:
·
transfer
dosimetric data to the “Gamma Sapiens” IGD over the Bluetooth interface in a real-time mode;
·
easily
and quickly choose measured dosimetric information
from a variety of display options including speedometer scale, digital scale, equalizer scale, linear scale;
·
display
measured DER in a real-time mode;
·
store
measured DER in the database;
·
view
DER information within a certain period of time stored
in the database;
·
set
parameters (criteria) for automatic recording of DER
into a track;
·
form
tracks by specified criteria and store tracks based on measured DER in the database;
·
view
tracks within a certain period of time stored in the database;
·
export
DER information that is stored in the database both
separately and as part of tracks to external mapping services Google Earth and
Google Maps;
·
display
main dosimetric information along with a measurement
point in real time on a map;
·
display
measured DE in a real-time mode;
·
store
measured DE in the database;
·
automatic
calculation of accumulated dose over a certain period of time based on the data
stored in the database;
·
view
DE information within a certain period of time stored in the database;
·
display
DE accumulation time in a real-time mode;
·
display
the status of power supply of the “Gamma
Sapiens” IGD in a real-time mode;
·
display
the statistical error in DER measurement in a
real-time mode;
·
set
and display a required number of DER thresholds,
which are monitored in terms of exceeding the current measured DER value, and are followed by alarm (light, audio, and
vibration) when exceeded;
·
set
and display a required number of DE thresholds, which are monitored in terms of
exceeding the current measured DE value, and are followed by alarm (light,
audio, and vibration) when exceeded;
·
back
up data from the database;
·
restore
data in the database from a backup copy;
·
easily
operate the “Gamma Sapiens” IGD by using the control commands:
· restart measurement;
· reset accumulated dose and dose
accumulation time;
· turn off the “Gamma Sapiens” IGD.
1) Before connecting a dosimetric
device to the Android device for the first time, in the Bluetooth settings of
the Android device specify the Device
name: CHECKPOINTx,
where x is any letter or digit.
2) When you first connect the dosimetric device to the Android device, enter: 0000 upon a Bluetooth pairing request, saying
“Enter PIN ...”.
3.2 Setting up each connection
Before each Bluetooth connection of the dosimetric device do the following:
1) TURN OFF “Flight mode” on the Android device.
2) Remove other connections from the
Bluetooth interface.
3) Start the “GS Ecotest” application on the Android
device.
4) Select the “Connect the device via Bluetooth” command from the menu of the “GS Ecotest”
application.
5) Turn on the dosimetric
device, and connect it to the Android device following the operating manual for
this dosimetric device.
4
Use of GS Ecotest
From the additional functions menu of the “GS Ecotest” application, choose the “Connect the device via Bluetooth” command. The dialog box
appears on the screen, saying “Bluetooth
permission request”, and allows the user either to enable (the Yes button), or disable (the No button) the Bluetooth interface for a
connection with the dosimetric device. When the Yes button is touched, the user will be
prompted to turn on the “Gamma Sapiens” device. This is achieved by pressing and holding
the ![]() button on “Gamma Sapiens” until the LED indicator starts blinking. High-frequency
blinking means that the dosimetric device is
searching for the Android device to make a Bluetooth connection. Decrease in blinking
frequency indicates that the connection is established.
button on “Gamma Sapiens” until the LED indicator starts blinking. High-frequency
blinking means that the dosimetric device is
searching for the Android device to make a Bluetooth connection. Decrease in blinking
frequency indicates that the connection is established.
When an attempt
is made to connect to a certain dosimetric device,
the dialog box appears on the screen of the Android device under the heading “The device is requesting permission to
connect” and displays a device type along with a serial number. Tap Yes to establish a connection, or No to cancel this action.
4.2 General principles of “GS Ecotest” performance
The user interacts with key functional
capabilities of the “GS Ecotest” application using the following modes:
· Indication
mode;
· Map display
mode;
· Database view
mode.
The user can switch between these modes by using
appropriate buttons at the top of the screen under the window heading. Each
operating mode offers the user a certain set of functional capabilities that,
along with graphical tools for information representation, are described later in
this document.
The user can touch the Menu button in any operating mode to access any function in the Options Menu.
Some application’s events, such as threshold levels
exceeding, lost connection, etc., are registered in Notifications for their further handling typical of the Android OS.
4.2.2 Features
of dosimetric
information measurement and display
4.2.2.1 DER measurement looks the following way. After beginning a measurement
process, measurement results and associated statistical errors will appear in
the Indication mode window of the “GS Ecotest” application.
During measurement the statistical error of each subsequent measurement result
decreases and reaches over time a specified statistical error. As soon as this error
is reached, the measurement process is still in progress, but part of statistical
data is no longer considered. That is why all subsequent measurement results
will be displayed with the statistical error that is lower than or equal to the
specified one.
The “Gamma Sapiens” device automatically
determines the specified statistical error depending on the radiation intensity.
The value of statistical error is grayed out until it is greater than that of
main relative permissible error limit in DER measurement.
The value of statistical error turns white when it becomes lower than or equal
to that of main relative permissible error limit in DER
measurement (see Тable 2.1 in the “Operating
manual”).
4.2.2.2 Measurement
of DE as well as dose accumulation time looks the following way. Each time the “Gamma Sapiens” device is switched on,
it starts the measurement of dose and dose accumulation time from zero values and
sends these data to the“GS Ecotest”application for processing and
display in the Indication mode
window.
4.2.3 Features of introduced concepts and
terms
For structuring
dosimetric information in a database of the “GS Ecotest” application, specific terms were defined and used,
such as:
· Point – location
that the user determines anywhere, indoors or outdoors. It precisely corresponds
to the coordinates of a point at which measurement of dose rate and (or) beta-particles
flux density (in case of operation of the devices, such as МKS-05 “ТЕRRА” or RKS-01 “STORA-TU”) is
performed. Dosimetric measurements at one and the
same Point mean that measurements are made in exactly the same place indoors or
outdoors. Each Point in the “GS Ecotest” database
consists of its unique name and identifier, which cannot be identical for
different Points. Points in open spaces may contain GPS
coordinates if the Android device has special hardware;
· Track is a
set of measurement points that are formed by certain user-defined parameters
(time interval, change of location, exceeding γ/β threshold, falling
below γ/β threshold) or those recorded manually. One point includes
one dosimetric measurement of dose rate or
beta-particles flux density (in case of operation of the devices, such as
МKS-05 “ТЕRRА” or RKS-01 “STORA-TU”).
Each Track in the “GS Ecotest”
database consists of its unique name and automatically created identifier both
of which cannot be repeated. The unique identifier and name, such as track name#point
number in the track (for example, Track 2013/12/12 14:15:16#5), are
automatically assigned to the points in the Track.
· Session – time
intervals for which a dosimetric device continuously accumulates
and transfers accumulated dose to the “GS
Ecotest” application. Each Session starts with zero values of accumulated dose as well as dose
accumulation time, and ends with a value of accumulated dose when this Session is finished. A new Session starts automatically as soon as
the dosimetric device is connected to the Android
device and completes when this dosimetric device is
disconnected from the Android device via the Bluetooth interface.
With the “Reset dose” function, the user can
finish the current Session of dose
accumulation on the dosimetric device and start a new
Session.
Indication
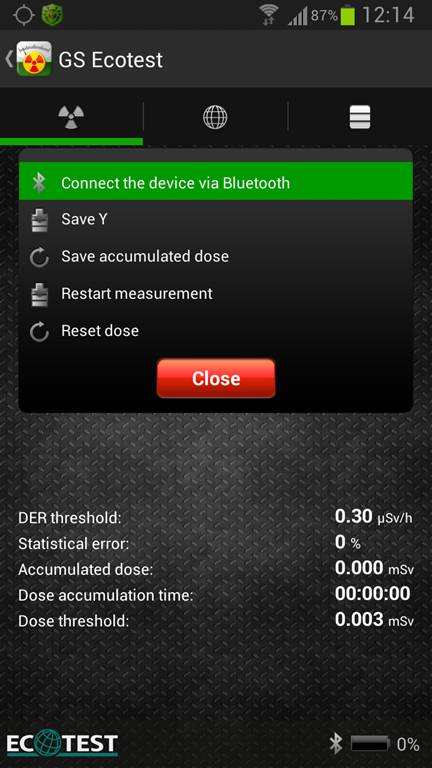
mode displays real-time dosimetric information, and allows
the user to choose commands from the additional functions menu.
4.3.1
Graphical components of the Indication mode
4.3.2
Description of additional functions
menu
The
additional functions menu lets the user perform the following functions:
- Connect the device via Bluetooth: Connects the dosimetric
device to the Android device via the Bluetooth interface.
- Disconnect the device via Bluetooth: Disconnects the dosimetric
device from the Android device.
- Save γ and Save β: Stores the current measured
value of dose rate or beta-particles flux density in a database.
- Save accumulated dose: Stores the current value of accumulated dose in a database.
- Restart measurement: Restarts a measurement process on the dosimetric
device.
- Reset dose: Resets the current value of accumulated dose on the dosimetric device.
To make use
of these functions, the user should touch the onscreen button of additional
functions menu, and tap an appropriate item.
Connect a dosimetric
device to the Android device via the Bluetooth interface
This function is intended to connect the dosimetric device to the Android device via the Bluetooth interface.
This is achieved by choosing “Connect
the device via Bluetooth” from the additional functions menu.
This menu
item is available only when the dosimetric device is
not connected to the Android device via the Bluetooth interface.
Disconnect a dosimetric
device from the Android device via the Bluetooth interface
To stop data communication between devices and
disable the connected dosimetric device, select “Disconnect the device via Bluetooth”.
The dialog box appears on the screen, asking whether the user confirms to stop
measurement and disconnect Gamma Sapiens
from the Android device or reject disconnection of Gamma Sapiens and continue measurements.
When disconnecting Gamma Sapiens from the Android device, Bluetooth is automatically turned
off on the Android device if it was disabled on the Android device before the
user selects “Connect the device via
Bluetooth”. Bluetooth remains on when it was enabled before the user
selects “Disconnect the device via
Bluetooth”.
Save the current value of dose rate or
beta-particles flux density to a database
This
function is used to store the current value of dosimetric
measurement in the database along with additional information for the user:
- value of dose rate (or
beta-particles flux density);
- dose rate threshold exceeding
(if no thresholds are exceeded, “
- measurement date and time;
- measurement statistical error;
- text comment to a certain
measurement;
- text comment to a certain measurement
point (when describing a new measurement point);
- measurement point identifier (when
describing a new measurement point);
- GPS coordinates of a
measurement point (when describing a new measurement point).
When the “Save γ” menu item is
selected, the window for saving dose rate appears, displaying a list of all
current dosimetric measurements that will be saved to
the database. There are two possible ways to save dose rate: either by creating
a new measurement point with a record of the current measurement or by adding a
current measurement to the existing (previously created) point.
When a new
point is created (the “Add to the
existing point” function), another window opens. The user will be prompted
to enter a unique identifier (name) of the point to be created. If necessary,
the user may type a comment to this measurement point.
When the
current measurement is added to the existing point (the “Add to the existing point” function), the user should select a
necessary point from the list of existing ones. In a new window, which is similar
to that for creating a new point, the name and comment fields of this point are
already filled in. Clicking the Save
button saves the current measurement. If necessary, the user may also leave a
comment.
Save the current value of accumulated dose to a
database
This
function is used to store the current value of accumulated dose in the
database, along with additional information for the user:
- value of dose rate;
- dose threshold exceeding (if no
thresholds are exceeded, “
- dose accumulation time;
- date and time when accumulated
dose was saved;
- type of a device used for the dose
measurement;
- serial number of a device used
for the dose measurement;
- text comment added to each value of
accumulated dose saved to the database.
To save the
current value of accumulated dose to the database, select the “Save accumulated dose” menu item. Accumulated
dose is saved to the database and is related to the current session of dose
accumulation.
Restart measurement on a dosimetric
device
The “Restart measurement” menu item lets
the user restart the measurement of dose rate (or beta-particles flux density).
The measurement is started with a zero value, while the value of a statistical
error equals to 255 %.
Reset the current value of accumulated dose on
a dosimetric device
This
function is intended to reset accumulated dose as well as dose accumulation
time on a dosimetric device. After selecting the “Reset dose” menu item, the window for
saving the current session appears in which the user can enter (optionally) an
identifier (name) of the current session before it completes. If the session
identifier is not entered, an identifier with the following format “Session yyyy/mm/dd”,
where yyyy/mm/dd is the ending time of a session, will
be automatically assigned to the current session. After the Save button is pressed, the current
session is saved to the database, and a new session is created. The saved
session automatically records the last value of accumulated dose. The accumulated
dose and dose accumulation time will be set to zero values.

To enter
this mode the Android device requires:
- Internet channel for using Google
Maps online;
- Switched on GPS receiver.
This mode
provides a view of main real-time dosimetric data on
a map along with a measurement point, which is indicated by a black table displaying
the following:
- numeric value of dose rate (or
beta-particles flux density);
- threshold value and threshold
exceeding (displayed in a red color);
- numeric value of a measurement
statistical error and its reliability.
The value of statistical error is grayed out
until it is greater than that of main relative permissible error limit in DER measurement. The value of statistical error turns white
when it becomes lower or equal to that of main relative permissible error limit
in DER measurement.
The user
can tap this black table to hide or show it. A special button displayed on a
map lets the user switch between different map views.
Сurrent dosimetric
information in real time can be shown on a map both separately and
simultaneously with dosimetric information stored in
the database.
The measurement points from the database are shown
on the map with one of four markers, depending on the range of the last value
of dose rate visible at this point: ![]()
![]()
![]()
![]() .
.
To show a
point on a map, tap ![]() either in the view window for a measurement
point or within a view window for a list of measurements or points.
either in the view window for a measurement
point or within a view window for a list of measurements or points.
4.4.1 Expot to external mapping services Google Earth and Google Maps
To export
data, first make them visible
on the “GS Ecotest” map. Then tap
the Export button. A dialog box will
open for typing a name and
comment for a .kmz file. The
user will prompted a name device name-application
name-date-number.

After you
tap the OK button,
the file will be saved
to a “GS Ecotest” directory on a memory card
of the device.
4.4.2
Display of tracks on a map
The tracks are marked as measurement points, connected with each other by lines with arrows. The direction of arrows indicates the user’s direction between points.

Additional graphical images
on the track display mean:
·
an
arrow without a line that comes into the first displayed point of the track –
points shown before the first displayed point of the track do not have GPS
coordinates;
·
an
arrow that comes out of the last point of the track – points shown after the
last displayed point of the track do not have GPS coordinates;
·
a numbered table between displayed points –
there are points with no GPS coordinates between these ones. The number of
points is given in the table.
You can also view the
tracks without the lines on the map. To turn it on/off, use ![]() in the bar.
in the bar.
This mode displays dosimetric data that the user has previously saved to the database. The database view window shows two groups of functions under the DOSES and MEASUREMENT headings respectively.

Functions
of the DOSES group make it
convenient to process and easy to read the necessary data on accumulated dose in
the database for a certain period of time.
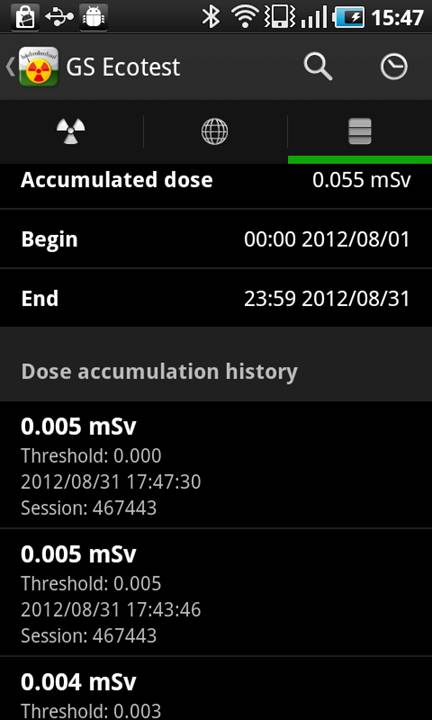
The Accumulated dose function allows the
user to see a dose accumulation history within a certain period of time as well
as calculate the absolute value of accumulated dose for this specific time period.
After the Accumulated dose function is selected,
a new window appears in which a list of accumulated dose records that the user
has previously saved are displayed. Each record in this list consists of a
numeric value of accumulated dose, dose threshold exceeding (if no thresholds
are exceeded, “
In this
window the user can automatically calculate accumulated dose for a specific
period of time by choosing the “Accumulated
dose” (![]() )
command next to the Search (
)
command next to the Search (![]() ) button. In the dialog box
that opens, the user should enter a starting and ending date and time of a
necessary time period for dose accumulation, and then click the Done button. In a
new window that opens the user can find the following information: a calculated
value of accumulated dose for a specified period of time, starting and ending
dates and times of this specific time period, along with saved records within a
particular dose accumulation history, based on which ones the value of
accumulated dose as determined.
) button. In the dialog box
that opens, the user should enter a starting and ending date and time of a
necessary time period for dose accumulation, and then click the Done button. In a
new window that opens the user can find the following information: a calculated
value of accumulated dose for a specified period of time, starting and ending
dates and times of this specific time period, along with saved records within a
particular dose accumulation history, based on which ones the value of
accumulated dose as determined.
In this
window the user can find all records of the dose accumulation history of a single
Session by using the “Search by session” (![]() )
command and by typing a necessary session number as requested. When
the search is complete, a new window opens, displaying a list of accumulated
dose records saved during this session.
)
command and by typing a necessary session number as requested. When
the search is complete, a new window opens, displaying a list of accumulated
dose records saved during this session.
The user should tap a record in the list to
open another window with the detailed information about this record, such as a
numeric value of accumulated dose, dose threshold exceeding (if no thresholds
are exceeded, “
The Sessions
function enables the user to view a dose accumulation history within a certain
period of time by Sessions as well
as calculate the absolute value of accumulated dose for this specific time
period.
If the Sessions
function is selected, a list opens with Sessions
of dose saving. Each record in this list provides information about a single dose
accumulation session, including a session name, a value of dose accumulated
during this session, a session identifier, a starting and ending date and time
of this session, and accumulation time for which a dose was accumulated during
this session.
In this window the user can automatically get
accumulated dose for a certain time period by using the “Accumulated dose” (![]() )
command next to the Search (
)
command next to the Search (![]() )
button. In the dialog box that opens, the user should enter a starting and
ending date and time of a necessary time period for dose accumulation as
requested, and then click the Done button. When a new window is opened, the user will see
the following information: a calculated value of accumulated dose for a specified
period of time, a starting and ending date and time of this specific time period,
along with a list of Sessions within
the dose accumulation history, based on which ones the value of accumulated
dose was determined.
)
button. In the dialog box that opens, the user should enter a starting and
ending date and time of a necessary time period for dose accumulation as
requested, and then click the Done button. When a new window is opened, the user will see
the following information: a calculated value of accumulated dose for a specified
period of time, a starting and ending date and time of this specific time period,
along with a list of Sessions within
the dose accumulation history, based on which ones the value of accumulated
dose was determined.

In this window the user can also find all records
of a dose accumulation history for a single Session by using the “Search
by session” (![]() ) command and by entering either a necessary
session number or a name as requested. When the search is complete, a new
window opens, displaying a list of saved Sessions
of dose accumulation.
) command and by entering either a necessary
session number or a name as requested. When the search is complete, a new
window opens, displaying a list of saved Sessions
of dose accumulation.
The user can tap a certain Session in the list to get detailed information about it, such as a
value of dose accumulated during this session, a dose accumulation time, a starting
and ending date and time of this session, a session name, a comment that the
user added to this session, as well as view all records within a dose
accumulation history that the user has previously saved during this Session.
Functions of the MEASUREMENTS group provide an easy way for the user to process and
view necessary data on values of dose rate (or beta-particles flux density) within
a specific period of time from the database.
If while viewing dosimetric
information in the database, there is a Marker icon ![]() in a view window, touching the Marker gives
the user a view of dosimetric information that is
displayed in the current view window of the database on the map. The
measurement points from the database are shown on the map with one of four
markers, depending on the range of the last value of dose rate visible at this
point:
in a view window, touching the Marker gives
the user a view of dosimetric information that is
displayed in the current view window of the database on the map. The
measurement points from the database are shown on the map with one of four
markers, depending on the range of the last value of dose rate visible at this
point: ![]()
![]()
![]()
![]() .Tapping
any color marker of a measurement point on the map will make a black table appear
with the following parameters of the last measurement the user made at this
point:
.Tapping
any color marker of a measurement point on the map will make a black table appear
with the following parameters of the last measurement the user made at this
point:
- name
of a measurement point in the database;
- numeric
value of dose rate (or beta-particles flux density) and units of measure;
- date
and time when a visible measurement was taken;
- arrow to the database to see a description of measurements
at this point.
In a database view mode, switching from the description of a measurement point in the database to a display marker of this point on the map is easily and straightforwardly done thereby, and vice versa –switching from the marker of a measurement point on the map to the description of measurements at this point in the database.

The Gamma
function lets the user view a history of measuring and saving dose rate at
different points of measurement for a certain period of time, along with this
kind of history of a single measurement point.
After the Gamma
function is selected, a new
window appears in which the records list of a history of measuring and saving
dose rate is displayed. Each record in this list includes the following
information: a numeric value of dose rate, a measurement point identifier
(name), a value of a statistical error in this measurement, dose rate threshold
exceeding (if no dose rate thresholds are exceeded, “
In this window the user can choose all records of
a dose rate measurement history of a specified point of measurement by using
the “Search by point” command and by
typing an identifier (name) of a necessary point as requested. When the search
is complete, a new window opens, displaying a history of measuring and saving
dose rate at a specified point.
To view the history of measuring and saving dose
rate at different points of measurement for a specific period of time, the user
should choose the “View by date” (![]() )
command next to the Search” (
)
command next to the Search” (![]() )
button, enter a starting and ending
date and time of a necessary time period to measure and save dose rate as
requested, and then click the Done
button. In a new window that appears the user will see the records list that is
sorted by time and contains a history of measuring and saving dose rate values
for a specified period of time at different measurement points.
)
button, enter a starting and ending
date and time of a necessary time period to measure and save dose rate as
requested, and then click the Done
button. In a new window that appears the user will see the records list that is
sorted by time and contains a history of measuring and saving dose rate values
for a specified period of time at different measurement points.

The user can tap a particular record in the
list to open a new window with the detailed information about this record, such
as an identifier (name) of a certain point, a text comment that the user added when
a measurement point was created, GPS coordinates of this point (coordinates are
displayed if they were detected when this point was created. Otherwise, “0.0000,
The Beta
function enables the user to view a history of measuring and saving values of
beta-particles flux density at different measurement points over a time period the
user is interested in, along with this kind of history of a certain point.
The user can view and handle data on
beta-particles flux density measurements stored in the database in the same way
as if using the Gamma function.
The Points
function allows the user to view a history of dose rate (or beta-particles flux
density) measurements at each necessary point of measurement.
Each Point
in the list is assigned a unique name and a six-digit identifier. The
search for a necessary Point can be
done by its name and identifier.
After the user selects the Point, a new window appears, displaying information about it.

This window
displays the detailed information about a particular Point as well as all saved measurements performed at this Point. The user can edit the
information about the Point and its
measurement in the following way: change the Point name, edit a comment added to the Point and to each single measurement.
The Tracks function allows the user to view
the history of recording the Tracks
based on automatically (by parameters) or manually recorded measurements of
dose rate (beta-particles flux density).
Each Track in the list is assigned a unique
name and a six-digit identifier. The necessary Track can be searched by its name and identifier. You can also
filter the Tracks by date and by
maximum measured value of Gamma.
When one of
the Tracks is selected, a window
appears, displaying information about the Track.

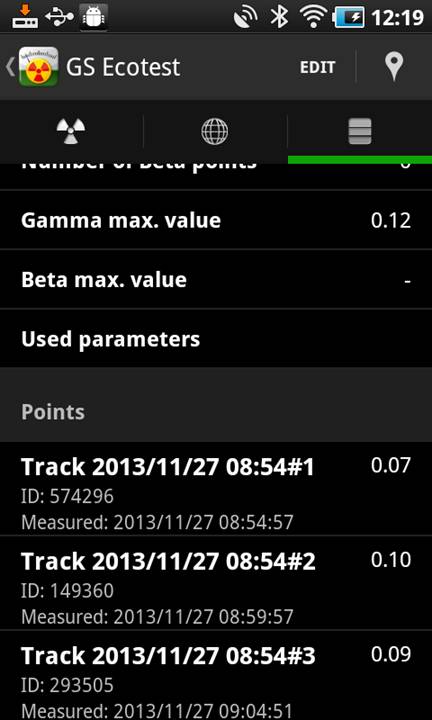
This window
displays the detailed information about this Track as well as all saved measurement points in it. The user can
edit the information about the Track
and its point: change the Track
name, edit a comment added to the Track and the point. The name of the point in
the Track cannot be changed.
To view
parameters by which the Track was
formed, choose “Used parameters”
menu item from the list. The window below shows the information about
parameters of forming this track.
The Options Menu of the “GS Ecotest”
application includes the items, such as Settings,
Help, Radiation Calculator, Start/Stop track
recording.
Settings provide
a variety of functions, such as:
- setting threshold values of accumulated
dose;
- setting threshold values of dose
rate;
- setting threshold values of beta-particles
flux density;
- setting parameters for
automatic recording of measurements into a track;
- application auto quit;
- setting a language for the “GS Ecotest”
user interface;
- turning on/off a startup animation for
connecting a dosimetric device.
- turning on/off a low battery
alarm of Gamma Sapiens;
- turning on/off a repeating low
battery alarm of Gamma Sapiens;
- clearing all data within a database;
- backing up a database to the flash
memory of the Android device;
- restoring a database from a previously
saved backup copy.
All settings
functions are grouped together into the following functional groups according
to intended use:
- THRESHOLDS;
- TRACKS;
- GENERAL;
- DATABASE.


This
function lets the user create new dose threshold levels and choose which already
existing ones to edit. After the Dose
thresholds function is selected, a new window appears, displaying a list of
previously saved dose thresholds. If there are no dose thresholds, the list
will be empty. Each record in this list includes a description of one dose
threshold, its identifier (name) and numeric value. In this window the user can
also create a new dose threshold, edit parameters of the existing threshold, or
choose which one to delete.

To create a
new threshold, select the “Add threshold”
command (the Add (+) button). After a new window appears,
the user may enter a name (identifier) of a new threshold (optionally), specify
a numeric value of a new threshold in mSv; set a vibration/sound
alert (if necessary), which might go off if the accumulated dose is over the specified
threshold value; select the “Save” command.
To edit the
existing threshold, choose a necessary one from the list. A new window for editing
the specified threshold appears in which the user can change a name (identifier)
of the existing threshold, a threshold value, and set a vibration/sound alert. Changes
the user made will not take effect until the “Save” command is selected.
When creating each new threshold or editing the
already existing one, the user can set a type of alert for this threshold (vibration/sound
alert) and define individually duration of each alert type. Each type of a signal
for each threshold can sound only once or continuously. If the threshold with a
set continuous alert is exceeded, a window opens with information about threshold
exceeding simultaneously with an appropriate alert in Indication mode screens. When the user closes this window, a
continuous alert stops.
Regardless of the alert type and its duration, the
appropriate alert is always reported according to the settings of a threshold
being largely exceeded.
To delete the
existing threshold, the user should choose a necessary one from the list with a
long press until the dialog box appears, asking whether the user confirms to delete
this threshold record. Сlick Yes to confirm this
action, or No to save this threshold
to the database (without deleting this threshold).
4.6.1.2 γ Thresholds
This function
enables the user to create new dose rate threshold levels and to choose which existing
ones to edit. After the γ thresholds
function is selected, a new window appears, displaying a list of previously
saved gamma thresholds. If there are no gamma thresholds, the list will be
empty. Each record in this list consists of a description of one gamma
threshold, its identifier (name) and numeric value. In this window the user can
also create a new gamma threshold, edit parameters of the existing threshold, or
choose which one to delete.
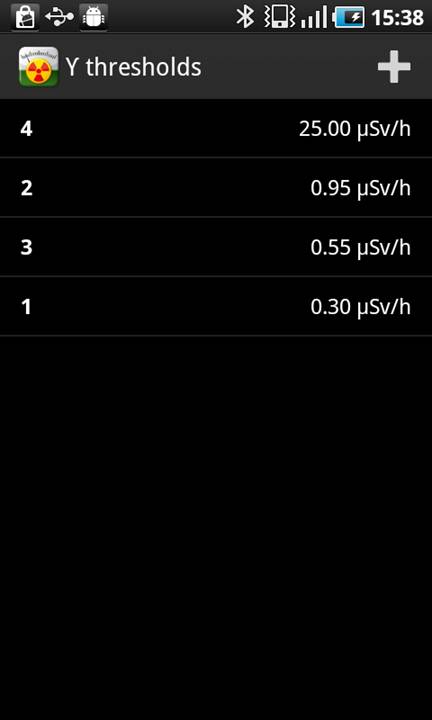
To create a
new threshold, select the “Add
threshold” command (the Add (+) button). After a new window appears,
the user may enter a name (identifier) of a new threshold (optionally), specify
a numeric value of a new threshold in μSv/h; set
a vibration/sound alert (if necessary), which might go off if the dose rate
exceeds the specified threshold value; select the “Save” command.
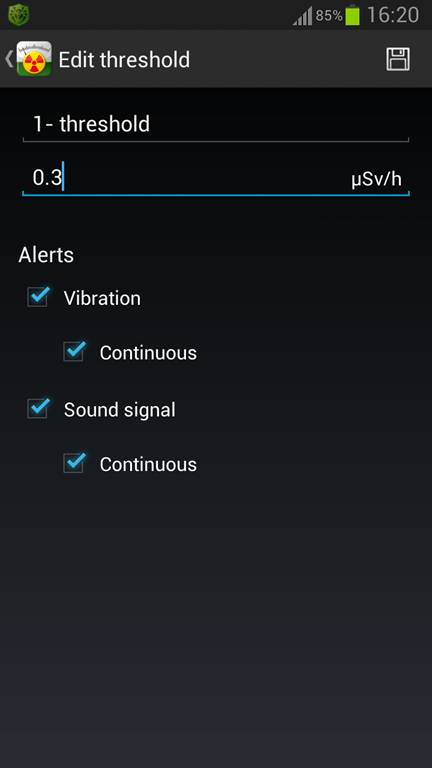
To edit the
existing threshold, choose a necessary one from the list. A new window for
editing the specified threshold appears in which the user can change a name
(identifier) of the existing threshold, a threshold value, and set a vibration/sound
alert. Changes the user made will not take effect until the “Save” command is selected.
When creating each new threshold or editing the
already existing one, the user can set a type of alert for this threshold
(vibration/sound alert) and define individually duration of each alert type.
Each type of a signal for each threshold can sound only once or continuously.
If the threshold with a set continuous alert is exceeded, a window opens with
information about threshold exceeding simultaneously with an appropriate alert
in Indication mode screens. When the
user closes this window, a continuous alert stops.
Regardless of the alert type and its duration, the appropriate alert is always reported according to the settings of a threshold being largely exceeded.
To delete
the existing threshold, the user should choose a necessary one from the list
with a long press until the dialog box appears, asking whether the user
confirms to delete this threshold record. Сlick Yes to confirm this
action, or No to save this threshold
to the database (without deleting this threshold).
4.6.1.3 β Thresholds
This function
lets the user create new thresholds of beta-particles flux density and choose
which existing ones to edit. After the β
thresholds function is selected, a new window appears, displaying a list of
previously saved beta thresholds. If there are no beta thresholds, the list
will be empty. Each record in this list includes a description of one beta
threshold, its identifier (name) and numeric value. In this window the user can
also create a new beta threshold, edit parameters of the existing beta threshold,
or choose which one to delete.
To create a
new threshold, select the “Add
threshold” command (the Add (+)
button). After a new window appears, the user may enter a name (identifier) of
a new threshold (optionally), specify a numeric value of a new threshold in Kpart./(sq.cm * min); set a vibration/sound
alert (if necessary), which might go off if the measured value of beta-particles
flux density exceeds the specified threshold value; select the “Save” command.
To edit the
existing threshold, touch a necessary one in the list. A new window for editing
the specified threshold appears in which the user can change a name
(identifier) of the existing threshold, a threshold value, and set a vibration/sound
alert. Changes the user made will not take effect until the “Save” command is selected.
When creating each new threshold or editing the
already existing one, the user can set a type of alert for this threshold
(vibration/sound alert) and define individually duration of each alert type.
Each type of a signal for each threshold can sound only once or continuously.
If the threshold with a set continuous alert is exceeded, a window opens with
information about threshold exceeding simultaneously with an appropriate alert
in Indication mode screens. When the
user closes this window, a continuous alert stops.
Regardless of the alert type and its duration,
the appropriate alert is always reported according to the settings of a
threshold being largely exceeded.
To delete
the existing threshold, the user should choose a necessary threshold from the
list with a long press until the dialog box appears, asking whether the user
confirms to delete this threshold record. Сlick Yes to confirm this
action, or No to save this threshold
to the database (without deleting this threshold).
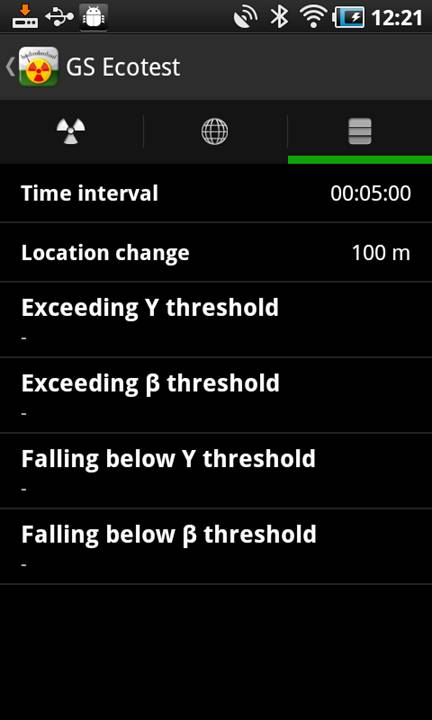
4.6.1.4 Measurement tracks
This function
lets the user set parameters
by which tracks will be
formed, i.e. measurement points will be recorded
automatically. These parameters include:
- Time interval;
- Location change;
- Exceeding γ threshold;
- Exceeding β threshold;
- Falling below γ threshold;
- Falling below β threshold.
Check the
parameter you want to activate. Tap the button that appears to set the value of
parameter. For parameters of exceeding and falling below γ/β
thresholds, choose thresholds that were preset in the database from the list.

4.6.1.5 Auto quit
The user can use this function to set the time before the “GS Ecotest” application stops measurement
automatically, turns off Gamma Sapiens
and stops running. The user can schedule the time of auto shutdown by selecting
the “Shutdown in…” or “Shutdown at…” commands.
An application auto shutdown can be followed by
a previous alert (audio signal and vibration). The user turns the alert on/off in
the auto shutdown screen. In the case of alert occurrence when the specified
time of the application auto shutdown is reached, audio and vibration alerts
are triggered continuously. In a dialog box that opens the user should confirm the
application shutdown. If the user confirms this action, a message with
information about auto shutdown will be registered in Notifications, and the application will stop running. If the user
does not confirm the application shutdown, the dialog box will be closed and
the application will continue running.
The “GS Ecotest”
application will automatically shut down at the specified time without notifying
the user unless an alert option is turned on in these settings.
4.6.1.6 Language
All languages
available in the “GS Ecotest”
user interface are listed in the Language screen. The user may change a language
of the application interface by tapping a necessary record in the list. A check
mark shows which language is currently being used in the application.
4.6.1.7 Startup animation
A startup
animation shows the user how to work with a dosimetric
device for data communication with the “GS
Ecotest” application via the Bluetooth interface.
The animation appears if the Startup
animation menu item is checked on the Settings
screen. If there is no check mark, the startup animation will be no longer
displayed.
4.6.1.8 Low battery
If this check box is selected, the alarm
option (audio signal and vibration) that informs about a low battery condition of
Gamma Sapiens
will be enabled on the Android device.
If the battery of Gamma Sapiens is discharged to
25 % of a full charge level, both one-time sound and vibration signals
will be produced. A corresponding message with information about Gamma Sapiens low battery discharged to
25 % will be registered in Notifications.
4.6.1.9 Repeat alarm
If this check box is selected, a repeating alarm option (audio signal
and vibration) that informs about a low battery condition of Gamma Sapiens will
be enabled
on the Android device.
If the battery of Gamma Sapiens is
discharged to 0 % of a full charge level, both 10-second sound and
vibration signals will be produced continuously. A corresponding message informing
about Gamma Sapiens low battery discharged
to 0 % will be registered in Notifications.
This kind of alarm and notifications will repeat regularly every
5 minutes, alerting the user of a critically low battery condition of Gamma Sapiens that might cause it to turn off. When such an alarm is
reported, the user should as soon as possible finish a measurement session by
selecting “Disconnect the device via
Bluetooth” and change the battery in Gamma
Sapiens.
4.6.1.10 Clearing an
ENTIRE database
Do not attempt
to select the "Clear database" command while a dosimetric device communicates with the Android device via
the Bluetooth interface. The user will be notified at that in the way of a corresponding
interactive message.
When the user
selects the "Clear database" command, the warning
message appears, requiring a decision, such as clearing all data contained in
the database.
When the "Clear database" command is selected, the warning message appears,
requiring the user to confirm an action to clear all data contained in the
database. Clicking Yes
will eliminate all data in the database without further restoring. If the user
clicks No, all data will remain in
the database without changes.
4.6.1.11 Backing up
For saving application
data and performing further restore operations, the user may copy the current
database file "ecotest.db",
if necessary, to the folder “GS Ecotest” on the
SD card. To restore data in the database from a backup file, a previously
created backup of the database should be copied to the "GS Ecotest" folder with a name "ecotest.db".
Do not
attempt to back up the database while a dosimetric
device communicates with the Android device via the Bluetooth interface. The
user will be notified at that in the way of a corresponding interactive
message.
4.6.1.12 Restoring a database
To restore
database data, which was previously saved to the "GS Ecotest" folder with the name "ecotest.db" on this Android device, select the "Restore database" command. The
user will be informed about each situation whether restoring the current
database from a backup completes successfully or some problems occur during
this restore process.
Do not
attempt to restore the database from a backup copy while a dosimetric
device communicates with the Android device via the Bluetooth interface. The
user will be notified at that in the way of a corresponding interactive
message.
The Help window provides the user with the
information about:
·
setting
the Android device before the first use of the “GS Ecotest” application;
·
setting
the Android device before each use of the “GS
Ecotest” application;
·
web
address of a website with more detailed information about the “GS Ecotest” application;
·
web address of the “ECOTEST” TM products website.
Requirements
and recommendations on setting the Android device before the first and each use
of the “GS Ecotest”
application are displayed for the user on a separate screen.
To go to
the above-mentioned websites for getting additional information, tap a necessary
link in the Help window.
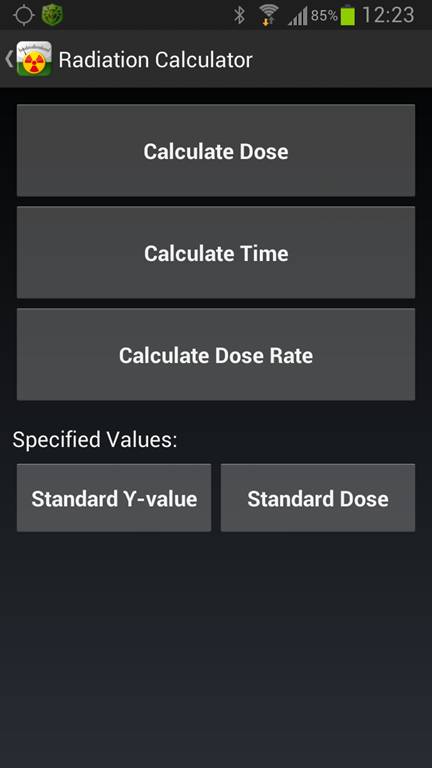
Radiation
calculator lets the user:
· calculate Dose at a specified period
of time and dose rate;
· calculate a Time period over which
dose will be accumulated at specified dose rate;
· calculate Dose Rate at which dose
will be accumulated over the specified period of time;
During calculation you can automatically monitor both data that you enter and data that are calculated relative to predefined reference values – permissible dose value and permissible dose rate value accumulated over one year – through the “Standard γ-value” or “Standard Dose” commands. If a certain value that is entered or calculated appears to be equal to or greater than a corresponding standard value, a standard value being exceeded shows change in color in the calculation window. In this way, the user is notified when a standard value is exceeded.
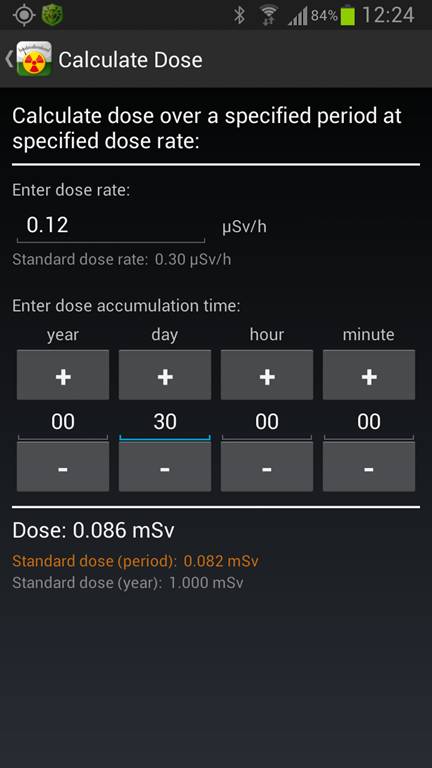
To
calculate dose for a specified time period at specified dose rate, in the
calculation window the user should enter the following values:
· Dose rate in a range from 0.00 to 999999 μSv/h.
If dose is calculated when dosimetry measurements are
taken, the current measured value of dose rate is set in this input field while
the calculation window is open. The user can accept or change this value if
desired.
Under the dose rate input field, there is a
value of standard dose rate that the user has entered previously with the “Standard γ-value” command.
·
Dose
accumulation time in corresponding input components – year, day, hour, minute.
The
calculated dose value is shown under a line next to Dose in mSv.
Under the calculated dose value, you can find the following reference values:
·
Standard
dose (period) – displays a value of recalculated standard dose per year relative
to the entered accumulation time;
·
Standard
dose (year) – displays a value of standard dose per year that the user has entered
previously with the “Standard Dose”
command.
To
calculate a time period over which specified dose will be accumulated at
specified dose rate, in the calculation window the user should enter the
following values:
- Dose
rate in a range from 0.00 to 999999 μSv/h.
If dose is calculated when dosimetry
measurements are taken, the current measured value of dose rate is set in
this input field while the calculation window is open. The user can accept
or change this value if desired.
Under the dose rate input field, there is a
value of standard dose rate that the user has entered previously with the “Standard γ-value” command.
- Accumulated dose in a range of
0.000 to 9999 mSv.
Under the dose value, you can find the following
reference values:
·
Standard
dose (period) – displays a value of recalculated standard dose per year
relative to the entered accumulation time;
·
Standard
dose (year) – displays a value of standard dose per year that the user has
entered previously with the “Standard Dose”
command.
The calculated value of time is shown under a line next to Time in units of time – year, day, hour, and minute.

To
calculate dose rate at which specified dose will be accumulated at the
specified period of time, in the calculation window the user should enter the
following values:
- Dose in a range from 0.000 to
9999 mSv.
Under a dose value, you can find the following
reference values:
·
Standard
dose (period) – displays a value of recalculated standard dose per year
relative to the entered accumulation time;
·
Standard
dose (year) – displays a value of standard dose per year that the user has
entered previously with the “Standard
Dose” command.
- Dose accumulation time in corresponding
input components – year, day, hour, minute.
The
calculated dose value is shown under a line next to Dose rate in μSv/h. Under the calculated dose rate value, there
is a value of standard dose rate that the user has previously defined using the
“Standard γ-value” command.

Use this command to set your reference value of
dose rate that will be used for calculations by the Radiation Calculator to
monitor dose rate values being entered and calculated. A standard value of dose
rate is set in a separate dialog box. If the user has not entered a standard value
or standard dose rate the user enters is equivalent to
0.00 μSv/h, entered or calculated
values of dose rate are not monitored in any calculation windows of the Radiation
Calculator, and the value of standard dose rate is not shown.
Use this command to set your reference value of
accumulated dose that will be used for calculations by the Radiation Calculator
to monitor dose values being entered and calculated. A standard value of dose
is set in a separate dialog box. If the user has not entered a standard value
or standard dose the user enters is equivalent to 0.000 mSv, entered or
calculated values of dose are not monitored in any calculation windows of the
Radiation Calculator, and the standard value of dose is not shown.
4.6.4
Start/Stop track recording
The Start/Stop
track recording function allows the user either to start or to stop track
recording. The function is only active when connected directly with the
dosimeter. After choosing the Start
track recording function, a dialog box opens in which you have to enter a
track name and comment. The standard name will be prompted.

When the OK
button is touched, recording of a new track will start. The track will be
formed according to the preset parameters. To stop track recording, choose the Stop track recording function from the
menu.